

Widgets
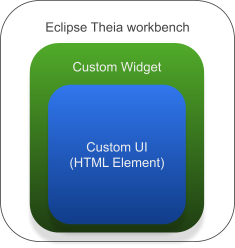
A widget is a part displaying content within the Theia workbench, e.g. a view or an editor. Examples for existing widgets in Theia are the file explorer, the code editor or the problems view. By contributing custom widgets, you can place your own custom UI in a Theia-based application. Your custom UI will behave the same as other widgets in terms of window layouts including the title tab, resizing, dragging and opening/closing (see screenshot below).
Furthermore, a widget will receive events from the surrounding workbench, e.g. on application start, on resize or on detach. The implementation of the actual content of a widget, which is rendered in the provided frame is completely up to you, though. As an example, you can implement some custom UI using React within a widget.
In a nutshell, a widget is a frame to embed some custom (HTML-based) UI into the Theia workbench (see diagram below)
In this article we will describe how to contribute a custom widget to the Theia workbench. We will focus on a simple view (in contrast to an editor) and use React to implement the UI.
If you are not yet familiar with contribution points in Theia or the use of dependency injection, please consider this guide on Services and Contributions.
If you would like to have a look at the example code, please use the Theia extension generator. Install the generator, select the “Widget” example and enter “MyWidget” as a name for the extension.
Contributing a Widget (a View)
Contributing a widget, in our example a view consists of three components:
- The actual widget, responsible for:
- Setting base parameters, such as an ID, a label and an icon
- Creating the actual UI and its behavior
- Reacting to lifecycle events such as `onUpdateRequest` or `onResize`
- A widget factory, responsible for instantiating the widget
- A widget contribution, responsible for wiring the view with the Theia workbench so that the widget can be opened from within the Theia workbench, e.g. via the views menus
Implementing a Widget
For the implementation of custom widgets, Theia provides several base classes to inherit from. This enables you to focus on creating your custom UI only, as the base classes already implement most required functions. Theia does not depend on a specific UI technology, like React, Vue.js or Angular. However, it provides convenience support by providing respective base classes, e.g. for React. If in doubt, using React is the most common choice for implementing custom widgets at the moment. Below you find an excerpt of the class hierarchy. In case you want to implement a widget using react, choose ReactWidget as a base class. If you want to implement a widget that mainly displays a tree, use TreeWidget. If you do not want to use React, use BaseWidget. Browse the type hierarchy of BaseWidget to see other available options.
- BaseWidget
- ReactWidget
- TreeWidget
- …
- ReactWidget
In the following code examples, we use ReactWidget as a base class. As shown below, we first initialize the widget with some base parameters:
id: To uniquely identify the widget, e.g. to open it via the WidgetManager.label: Shown in the tab when the widget is open.caption: Shown when hovering over the tab when the widget is open.closable: Whether the user can close the widget (via the “x” in the tab or via right click menu).iconClass: The icon shown in the tab when the widget is opened.
mywidget-widget.tsx
@injectable()
export class MyWidget extends ReactWidget {

static readonly ID = 'my:widget';
static readonly LABEL = 'My Widget';

@postConstruct()
protected init(): void {
    this.doInit();
}

protected async doInit(): Promise<void> {
    this.id = MyWidget.ID;
    this.title.label = MyWidget.LABEL;
    this.title.caption = MyWidget.LABEL;
    this.title.closable = true;
    this.title.iconClass = 'fa fa-window-maximize'; // example widget icon.
    this.update();
}
When using the respective base class, the implementation of a widget can be really minimal and focused on the custom UI part. In our example, we just implement the render function that will create our actual custom UI (using JSX/React). The example UI contains a button that will trigger the displayMessage function below.
mywidget-widget.tsx (continued)
protected render(): React.ReactNode {
    const header = `This is a sample widget which simply calls the messageService in order to display an info message to end users.`;
    return <div id='widget-container'>
              <AlertMessage type='INFO' header={header} />
              <button className='theia-button secondary' title='Display Message' onClick={_a => this.displayMessage()}>Display Message</button>
           </div>
}

@inject(MessageService)
protected readonly messageService!: MessageService;

protected displayMessage(): void {
    this.messageService.info('Congratulations: My Widget Successfully Created!');
}
Please note, that you can override functions of BaseWidget or ReactWidget to hook into specific life cycle events of a widget, e.g. onUpdateRequest or onResize. These events are defined by Phosphor.js, the underlying window management framework, see this documentation about the Widget class.
Besides implementing the actual widget, you need to wire it with the Eclipse Theia workbench, which is described in the next two sections.
Implementing a Widget Factory
Widgets in Theia are instantiated and managed by a central service, the WidgetManager. This allows the application to keep track of all created widgets. As an example, the WidgetManager supports the function getOrCreate, which will either return an existing widget, if it was already created, or create a new one if not.
To make a custom widget instantiatable by the widget manager, you need to register a WidgetFactory. A widget factory consists of an ID and a function that creates the actual widget. The widget manager will collect all contributed widget factories and pick the correct one for a respective widget by ID.
In our example (see code below), we first bind our widget MyWidget to itself so that we can instantiate it in our factory using dependency injection. This is not necessarily required for all widgets if they do not use dependency injection inside. We are using dependency injection in our example above to retrieve the message service and for the @postConstruct event. Second, we bind a WidgetFactory defining the ID of the widget and the createWidget function. This function allows you to control the widget creation, e.g. to pass specific parameters to a custom widget if required. In our simple example, we just use the dependency injection context to instantiate our widget.
mywidget-frontend-module.ts
bind(MyWidget).toSelf();
bind(WidgetFactory).toDynamicValue(ctx => ({
    id: MyWidget.ID,
    createWidget: () => ctx.container.get<MyWidget>(MyWidget)
})).inSingletonScope();
Now you could already open a widget manually via using the widget manager API. However, for most use cases, you want to add a view to the view menu and also provide a respective command. This can be conveniently done using a widget contribution as described in the next section.
Widget Contribution
Widget contributions allow you to wire a widget into the Theia workbench, more precisely to add them to the view menu and the quick command bar. Theia provides a convenient base class AbstractViewContribution to inherit from, which already implements the most common feature set (see example code below). For the initialization, you only need to specify the following parameters:
widgetID: The ID of the widget, used to open it via the widget managerwidgetName: The name which is displayed in the view menu. Usually the same name as used for the widget tab.defaultWidgetOptions: Option to influence where the widget will be displayed on opening, e.g. in the left area of the workbench. See the typedoc for more information.toggleCommandId: The command that opens the view. You can use the pre implementedopenViewfunction provided by the super class.
Besides specifying these base parameters, you need to register the command to open the view. The base class implements the respective command contribution interface, so you just need to implement registerCommands to do so (see below).
mywidget-contribution.ts
export const MyWidgetCommand: Command = { id: 'widget:command' };
export class MyWidgetContribution extends AbstractViewContribution<MyWidget> {
   constructor() {
       super({
           widgetId: MyWidget.ID,
           widgetName: MyWidget.LABEL,
           defaultWidgetOptions: { area: 'left' },
           toggleCommandId: MyWidgetCommand.id
       });
   }

   registerCommands(commands: CommandRegistry): void {
       commands.registerCommand(MyWidgetCommand, {
           execute: () => super.openView({ activate: false, reveal: true })
       });
   }
}
With the contribution above, the view will now be shown in the standard “view” menu of Theia and you can also use the respective “open view” command to open it.
