
Building Custom AI assistants and AI support with Theia AI
Note for end users: This documentation is for tool builders who want to create AI capabilities in their own tools. If you're looking for the AI-powered Theia IDE as an end user, please see the user documentation or go to the download page to get Theia IDE.
This section explains how to build custom AI assistants and integrate AI support into custom tools and IDEs using Theia AI. Theia AI, part of the Theia Platform, is a powerful framework designed to help tool builders integrate tailored AI capabilities into their tools and IDEs with ease (see also this Theia AI introduction). It provides reusable components, prompt management, LLM integration, and flexible user interfaces, allowing you to focus on delivering domain-specific AI features. This section is targeted at tool builders using Theia and Theia AI as a platform to build custom tools and IDEs. For detailed information on how to use the experimental AI features in the Theia IDE as an end user, refer to the user documentation. To learn how to generally extend Theia by creating Theia extensions, including AI ones, visit the extension authoring guide.
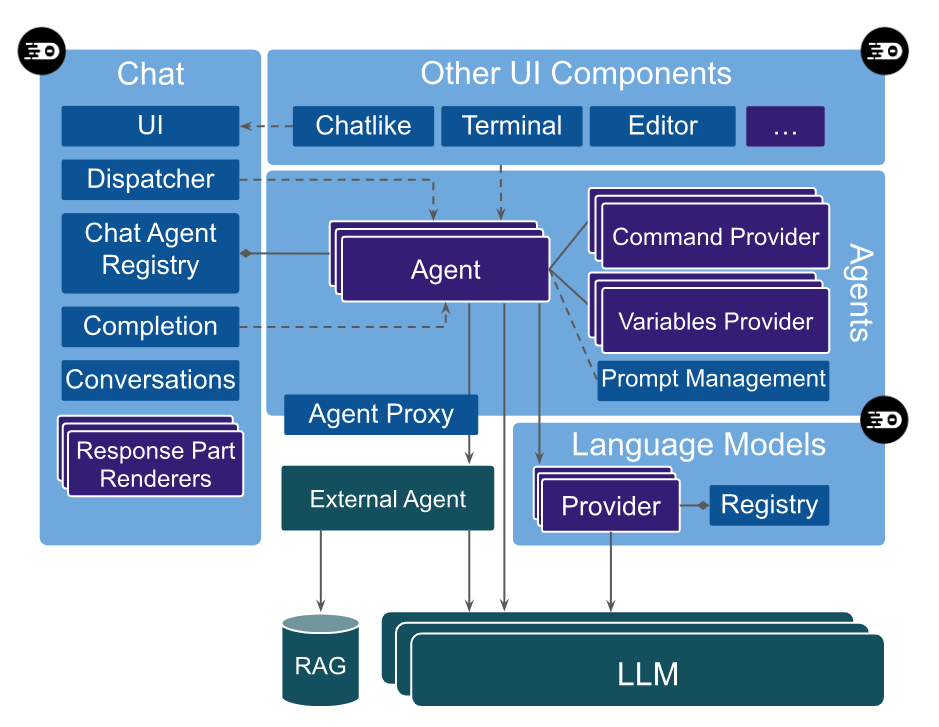
High Level Architecture of Theia AI
Learn more about Theia AI:
👉 Introducing Theia AI: The Open Framework for Building AI-native Custom Tools and IDEs
👉 Watch the video: AI-Native Tools with Full Control: Theia AI & The AI-Powered Theia IDE In Action
Table of Contents
- Creating Agents with Theia AI
- Variables and Tool Functions
- Custom Response Part Rendering
- Managing the State of a Chat Response
- Custom LLM Provider
- Change Sets
- Chat Suggestions
- Learn more
Creating Agents with Theia AI
In this section, we will introduce the concept of agents and demonstrate how to create your own custom agents. An Agent in Theia AI is a self-contained component mediating between the user interface that triggers the agent, and the LLM. Thus, it is typically invoked with a user input or a UI event, collects relevant context, produces one or more prompts, handles the communication with a language model (LLM),, and invokes actions in the tool and/or returns outputs to the UI as a result. Each agent can have unique behavior based on its design.
Agents can generally be integrated into any part of the tool (e.g., terminals, editors, custom widgets) and also interact with any available and exposed API of Theia to collect context, trigger actions, or show results. A special type of agent in Theia AI is ‘Chat Agent’, which is automatically integrated into Theia AI’s default chat UI. A chat agent handles conversational interactions, making them suitable for tasks like answering questions in a chat interface.
An important design decision is how you split your AI feature set among agents. Please note that Theia AI enables any kind of modularity from one agent capable of handling many types of user requests or events to an agent delegating sub-tasks to other agents, or even several agents operating on one request. Agents can communicate with each other, so you can chain agents for one user request. This decision really depends on the specific use cases and project. Theia AI makes it easy to iteratively refine the modularity of agents while developing it. A good start is typically to start with one agent per use case.
This guide will walk you through creating agents and chat agents using Theia AI, providing a deeper understanding of the framework and how to leverage it for custom use cases.
Creating an Agent
In general, an agent is essentially an injectable Theia service offering a specific API for its clients, such as custom widgets, editors, or menu items. Clients can obtain the instance of the agent from the agent registry or get it injected via DI, and call its methods. Usually those methods are very use case specific, often taking parameters for context that are relevant and already available to the clients calling the agents. The agent will then construct one or more prompts, obtain one or more language models, process its output, invoke actions in Theia and/or return a result to the client, e.g. to show a result message, offer follow-up questions or buttons to perform actions.
As you see, an agent is rather generic — and this is on purpose. It is designed to cater many different use cases integrated in a variety of UI components, widgets, or editors. An example of such an agent in the Theia IDE is the code completion agent integrated in the code editor.
Creating a Chat Agent
A Chat Agent is integrated into the default chat UI provided by Theia AI and thus needs to implement a more specific interface, so it can be invoked from the chat UI generically. It’s designed for conversational interaction with users.
Let’s create a new agent for the Theia IDE as an example! This new agent will assist users in identifying (and later executing) arbitrary commands in the Theia IDE, such as opening the settings or showing the toolbar. You can review the full code of this agent as a reference.
Defining the Prompt Fragment
The first step in creating a chat agent is defining the system prompt fragment, which acts as the foundation for guiding how the agent interacts with the LLM.
import { BasePromptFragment } from '@theia/ai-core';

export const commandPromptTemplate: BasePromptFragment = {
   id: 'command-chat-agent-system-prompt-template',
   template: `Always respond with: “I am the command agent"`
}
This template sets the behavior of the agent, in the example above, it will always respond with a test String for now.
Creating the Chat Agent
Next, we will create the chat agent, which allows you to customize the agent’s behavior, specify its language model requirements, which prompt templates it uses, and define its interaction with users. In our case, we want to create a simple Chat Agent for which we extend the reusable base implementation provided by Theia AI (see code example below).
AbstractStreamParsingChatAgent takes care of a basic conversation flow and streaming, so we need to define the required properties including a name, an id, language model requirements, and which system prompt our agent uses. This agent will be available in the default chat UI and can be referenced via @Command. The agent will respond based on the behavior defined in the prompt.
import { AbstractStreamParsingChatAgent } from '@theia/ai-chat';
import { LanguageModelRequirement } from '@theia/ai-core';

export class CommandChatAgent extends AbstractStreamParsingChatAgent {
   id: string = 'Command';
   name: string = 'Command';
   description: string = `Helps users find and execute commands in the IDE`;
   languageModelRequirements: LanguageModelRequirement[] = [{
       purpose: 'chat',
       identifier: 'default/universal',
   }];
   protected defaultLanguageModelPurpose: string = 'chat';

   // Register the prompt fragment with the agent
   override prompts = [{ id: commandPromptTemplate.id, defaultVariant: commandPromptTemplate }];
   protected override systemPromptId: string = commandPromptTemplate.id;
}
In the example above, we register the prompt fragment with the agent using the prompts property and set the systemPromptId to reference it. This allows Theia AI to provide generic features such as the prompt editor and automatic variable resolution. The Prompt Service will handle resolving variables and functions in your prompt fragments automatically.
Registering the Agent
To integrate our agent with Theia AI, we need to register it. Theia as a platform is modular, so we can just register the agent along with the existing agents via dependency injection, no forking or customization of Theia framework code is required. See also the section on services and contributions and specifically the section on contribution points. In the following code example, we register our agent as an ‘Agent’ and as a ‘ChatAgent’. With this, the simple agent above will already be available in the default chat, you can directly “talk” to it via typing “@Command”. In the current state, it will of course only respond with “I am the command agent”.
bind(Agent).toService(CommandChatAgent);
bind(ChatAgent).toService(CommandChatAgent);
Refine your Agent
The next step is typically the most effort and it is actually unrelated to Theia AI: You need to develop the behavior of the agent, including one or more prompts that reliably return the expected output.
In our example, we want to return an executable Theia command that the user is looking for with their question. For this, we need to augment our prompt with variables (see section “Variables and Tool Functions”) to give the LLM the necessary context information on what Theia commands are available. Moreover, we want this response in a parsable format, so that we can easily detect the command selected by the LLM in its response and provide the user with the option to directly execute the command. See the section “Response Renderers” for more details.
Getting such agent implementations right typically requires a bit of prompt evaluation with a set of expected user queries. A huge help in Theia AI is that you can modify the prompt fragments at runtime to test different scenarios and tweak the prompt until you are satisfied, instead of changing the prompt fragments in the code and need to rebuild after every change.
Also, if the underlying LLM supports it, structured output is a huge time saver, as this usually guarantees that the output follows a specific format and avoids coping with variations in your agent’s parsing logic. This guide is focussed on Theia AI and not about developing specific agents per se. If you need support building your own custom AI assistance, please get in contact with a service provider and browse our resource section.
Agent Modes
Chat agents can define multiple operational modes that allow users to control how the agent responds. Modes enable agents to adjust their behavior based on user preferences, such as providing concise versus detailed responses or switching between different operational styles like "explain" versus "fix".
Defining Modes
To add mode support to your chat agent, define a modes array with mode definitions:
export class MyChatAgent extends AbstractStreamParsingChatAgent {
    readonly id = 'MyAgent';
    readonly name = 'MyAgent';

    modes = [
        { id: 'concise', name: 'Concise' },
        { id: 'detailed', name: 'Detailed' }
    ];
}
When an agent defines multiple modes, a mode selector appears in the chat input UI, allowing users to select their preferred mode through a dropdown or cycle through modes using Shift+Tab.
Using Modes in Agent Implementation
The selected mode is passed with the chat request via request.request.modeId. Your agent can then adapt its behavior accordingly:
override async invoke(request: MutableChatRequestModel): Promise<void> {
    const modeId = request.request.modeId || 'concise';

    if (modeId === 'concise') {
        // Provide brief response
    } else {
        // Provide detailed response
    }
}
See the ModeChatAgent in the Theia codebase for a complete example implementation demonstrating how to use modes to adjust response verbosity.
Agent Capabilities
Capabilities provide a mechanism for agent builders to expose optional, toggleable behaviors to users in a user-friendly way. Instead of requiring users to understand and manually wire up tool functions, MCP servers, or prompt fragments, an agent can declare which capabilities it supports and let users simply toggle them on or off per request via compact chips in the chat input.
For end users, the experience is described in the user documentation on Agent Capabilities. This section explains how to define capabilities in your own agents.
Defining Capabilities in a Prompt Template
Capabilities are declared using the {{capability:fragment-id [default on|off]}} syntax inside a prompt template. Each such variable registers a toggleable capability backed by the prompt fragment with the given ID.
default onmeans the capability is active unless the user explicitly turns it off.default offmeans the capability is inactive by default and must be opted into.- If the
defaultkeyword is omitted, the capability defaults tooff.
When the capability is enabled for a request, the referenced prompt fragment is resolved and its content is included in the agent's system message. When disabled, it resolves to nothing.
For example, an agent prompt template that offers two opt-in capabilities would include lines like:
{{capability:my-shell-feature default off}}
{{capability:my-reporting-feature default off}}
Each line appears as a chip in the chat input when this agent is active. Chip selections are persisted per session and restored when the user returns to a session.
Adding Name and Description via Frontmatter
By default, a capability chip displays the raw fragment ID as its label. To provide a human-readable name and a tooltip description, add YAML frontmatter to the .prompttemplate file for the backing prompt fragment:
---
name: Shell Execution
description: Allows the agent to run shell commands on the host system.
---
Your prompt fragment content here...
The name field is shown as the chip label and in the agent configuration table. The description is shown as a tooltip when hovering over the chip. The frontmatter is stripped before the content is sent to the LLM, so it does not affect the prompt itself.
Built-in prompt fragments can embed frontmatter directly as part of their template string in TypeScript. When a user customizes such a fragment, the localized name and description from the current locale are automatically included in the frontmatter of the user's copy.
What Goes Inside a Capability Fragment
A capability fragment can contain anything a regular prompt fragment can: plain instructions, variable references, tool function references (~{functionId}), delegation instructions to other agents, or even combinations of all of these. This means a single capability chip can encapsulate arbitrarily rich behavior. For example:
- A tool-based capability might include a
~{shellExecute}tool function reference together with instructions on when and how to use it. - A delegation-based capability might include instructions for delegating to a sub-agent via
~{agentDelegation}, complete with example delegation prompts. - A context-injection capability might add domain-specific knowledge or guidelines into the system message when enabled.
The agent configuration view in the Theia IDE shows all declared capabilities for an agent, including their fragment ID, default state, and description, giving users an overview without requiring them to read the raw prompt.
Variables and Tool Functions
Agents often need to interact with the tool to fetch dynamic data, such as a text selection, project-data or any tool-specific data. Theia AI allows you to encapsulate this data access in Variables, which can then be used in prompts or user requests and will be resolved with the actual data from the tool at runtime. Furthermore, agents can use so-called Tool Functions that allow the underlying LLM to proactively call an action, either to retrieve more information or to trigger any kind of action including the modification of data.
Variables
Theia AI by default supports two types of variables:
- Global Variables are available to all agents. Theia and Theia AI already provide a standard set of variables, such as the currently selected text. Tool builders can easily register their own global variables to provide arbitrary additional data from the tool state, including their custom tool components. Global variables can also be used in any prompt fragment, but are also available to users in the default chat provided by Theia AI, e.g. “#currentText” for the currently selected text.
- Agent-specific Variables are only available to specific agents (and in their prompt fragments), but not to other agents and also not in the default chat.
Agent-specific Variables
Agent-specific variables are controlled by a specific agent. To fill a variable with data, you can literally use any internal Theia API or other external APIs or methods you like. As an example, let’s again look at the chat agent that assists users in identifying (and later executing) arbitrary commands in the Theia IDE, such as opening the settings or showing the toolbar. You can review the full code of this agent as a reference.
To allow the underlying LLM to identify the right command, we want to send it a list with all available commands. To achieve this, we first retrieve a list of all available commands using the CommandRegistry (see code example below). This step is independent of Theia AI and you could retrieve any sort of data here instead. Second, we resolve the variable ‘command-ids’ when receiving the system prompt’ (also see code example below).
// Retrieve all available commands
const knownCommands: string[] = [];
for (const command of this.commandRegistry.getAllCommands()) {
   knownCommands.push(`${command.id}: ${command.label}`);
}

// Resolve the variable when retrieving the system prompt
const systemPrompt = await this.promptService.getPrompt('command-chat-agent-system-prompt-template', {
   'command-ids': knownCommands.join('\n')
});
Please note that the manual resolvement of variables is not necessary when using global variables. Now we can simply use our agent-specific variable in our prompt fragments, e.g. like this:
You are a service that helps users find commands to execute in an IDE.

These are the available commands:
Begin List:
{{command-ids}}
End List
If an agent uses agent-specific variables, it can decide to explicitly declare them. This enables one to keep track of used variables and optionally even show this information to the user (see example screenshot below).
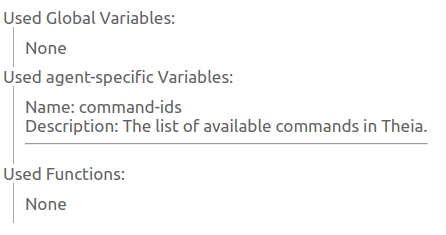
To declare an agent-specific variable, simply add it like this in the constructor of your agents, along with an optional description and whether it is used in the prompt fragment or not.
this.agentSpecificVariables = [{
   name: 'command-ids',
   description: 'The list of available commands in Theia.',
   usedInPrompt: true
}];
Global Variables
Global variables are available to all agents. Therefore, they are provided as a dedicated contribution. In the following, we will define a simple global variable that resolves to the current date, i.e. to the time when the variable get resolved in a request. You can review the full code of this variable for a complete description. A Global variable basically consists of four parts.
First, we define the variable, as it can be used in requests. In the following example, we define two optional arguments to influence the format.
export const TODAY_VARIABLE: AIVariable = {
   id: 'today-provider',
   description: 'Does something for today',
   name: 'today',
   args: [
       { name: TodayVariableArgs.IN_ISO_8601, description: 'Returns the current date in ISO 8601 format' },
       { name: TodayVariableArgs.IN_UNIX_SECONDS, description: 'Returns the current date in unix seconds format' }
   ]
};
Second, we register the variable using an ‘AIVariableContribution’ (see code example below). Third, we resolve the variable (also see code example below). Please note that for resolving a variable, you can access all necessary APIs, including tool-specific API or custom services.
export class TodayVariableContribution implements AIVariableContribution, AIVariableResolver {
   // Register the variable resolver
   registerVariables(service: AIVariableService): void {
       service.registerResolver(TODAY_VARIABLE, this);
   }

   async resolve(request: AIVariableResolutionRequest, context: AIVariableContext): Promise<ResolvedAIVariable | undefined> {
       if (request.variable.name === TODAY_VARIABLE.name) {
           return this.resolveTodayVariable(request);
       }
       return undefined;
   }

   private resolveTodayVariable(request: AIVariableResolutionRequest): ResolvedTodayVariable {
       const date = new Date();
       if (request.arg === TodayVariableArgs.IN_ISO_8601) {
           return { variable: request.variable, value: date.toISOString(), date };
       }
       if (request.arg === TodayVariableArgs.IN_UNIX_SECONDS) {
           return { variable: request.variable, value: Math.round(date.getTime() / 1000).toString(), date };
       }
       return { variable: request.variable, value: date.toDateString(), date };
   }
}

...

bind(AIVariableContribution).to(TodayVariableContribution).inSingletonScope();
It can now be used in any prompt fragment, as well as in user requests.
Chat Context Variables
Theia AI supports attaching rich contextual information to chat requests via context variables. Unlike standard variables discussed above, which simply inject a value into the prompt, context variables provide both a value and a contextValue. The value is inserted at the position of the variable usage, while the contextValue is added to the ChatRequestModel.context—supplying additional data that the chat agent and underlying LLM can leverage for more informed responses.
Learn more about the generic concept of context variables in Theia AI:
👉 Enhancing Your Tools with Chat Context in Theia AI
Context variables enable users to scope their requests by including elements such as files, symbols, or other domain-specific data elements. It is up to the agent to decide how this additional data is processed. Common processing approaches include:
- Summarization: The agent may summarize the provided context (e.g., listing file names) before passing it to the LLM.
- Context Window Management: The agent may decide how much context to include the entire context if it fits, apply ranking/summarization if too large, or use multi-turn prompt flows to incrementally identify relevant parts and refine the provided context.
- On-Demand Retrieval: Instead of sending all context upfront, the agent may also expose tool functions so that the LLM can fetch specific elements when needed.
Note that the context feature is enabled by default, but can be disabled by rebinding the AIChatInputConfiguration in your custom dependency injection module:
rebind(AIChatInputConfiguration).toConstantValue({
    showContext: false,
    showPinnedAgent: true
});
Usage
Users can attach context elements to chat requests in several ways:
- Drag and Drop: Drag elements into the chat input, e.g. dropping files from the file explorer.
- Typing: Enter the context variable name (e.g.
#file), which triggers a quick pick selection dialog. - Auto-completion: Type and select a specific element (e.g.
#file:myFile.txt).
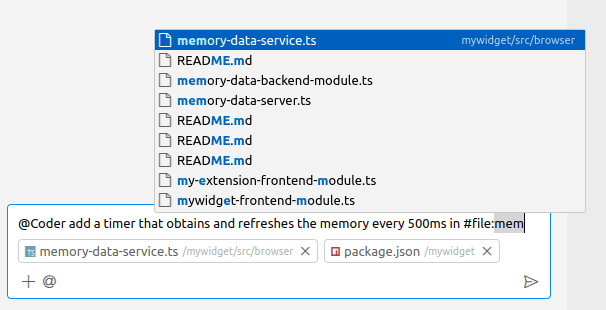
Once attached, the context elements are displayed in the chat input to the user.
Thinking Mode for Claude
Theia AI provides support for Claude's "thinking mode" (extended thinking). By setting a custom request parameter—either globally or for a specific chat session—you can instruct the model to "think more." This is particularly useful for more difficult questions and shows its strengths when using agents like the Architect or Theia Coder on complex coding tasks.
The corresponding request settings looks like this:
"thinking": {
    "type": "enabled",
    "budget_tokens": 8192
}
As shown in the following video, we first ask the model a fairly difficult question without thinking mode enabled. It responds quickly but with an incorrect answer. We then switch to a new chat session and enable thinking mode via a chat-specific setting. This time, the model takes noticeably longer to respond. To keep the video short, we switch to a previously completed session with the same setting, and it arrives at the correct solution.
As mentioned in the previous section, the UI for chat-specific settings is currently experimental. We aim to improve its usability in the future, including making options like enabling thinking mode more accessible. If you build a custom tool based on Theia AI, you might want to introduce your own specific way of exposing thinking mode to your users anyways or not expose it at all.
Implementation Example: File Context Variable
The following code registers a file context variable provider along with its label provider:
export default new ContainerModule(bind => {
    ...
    // the plain variable registration
    bind(AIVariableContribution).to(FileVariableContribution).inSingletonScope();
    // the registration of the additional support contributions, such as the drag-and-drop handler, auto-completion, etc.
    bind(AIVariableContribution).to(FileChatVariableContribution).inSingletonScope();
    // the label provider controlling how the context element is displayed in the chat input
    bind(ContextFileVariableLabelProvider).toSelf().inSingletonScope();
    bind(LabelProviderContribution).toService(ContextFileVariableLabelProvider);
    ...
});
File Variable Provider
This provider resolves a file variable by reading the contents of the specified file. Note the difference: it returns a value (e.g., a workspace-relative file path) which will be inserted in to the user request when #file:abc.txt is used, and a contextValue (the file’s actual content) for further processing of the agent.
export const FILE_VARIABLE: AIVariable = {
    id: 'file-provider',
    description: 'Resolves the path and the contents of a file',
    name: 'file',
    label: 'File',
    // specifies the icon to be used in the user interface for selecting this variable type
    iconClasses: codiconArray('file'),
    // sets this variable as a context variable
    isContextVariable: true,
    // specifying the arguments this variable takes (the URI of the file)
    args: [{ name: 'uri', description: 'The URI of the requested file.' }]
};

@injectable()
export class FileVariableContribution implements AIVariableContribution, AIVariableResolver {
    @inject(FileService)
    protected readonly fileService: FileService;

    @inject(WorkspaceService)
    protected readonly wsService: WorkspaceService;

    registerVariables(service: AIVariableService): void {
        service.registerResolver(FILE_VARIABLE, this);
    }

    async canResolve(request: AIVariableResolutionRequest, _: AIVariableContext): Promise<number> {
        return request.variable.name === FILE_VARIABLE.name ? 1 : 0;
    }

    async resolve(request: AIVariableResolutionRequest, _: AIVariableContext): Promise<ResolvedAIContextVariable | undefined> {
        //...
        try {
            const content = await this.fileService.readFile(path);
            return {
                variable: request.variable,
                value: await this.wsService.getWorkspaceRelativePath(path),
                contextValue: content.value.toString(),
            };
        } catch (error) {
            return undefined;
        }
    }
    //...
}
File Chat Variable Contributions
To enhance usability, an additional FrontendVariableContribution can be provided to handle argument picking, auto-completion, and drag-and-drop support for file context variables.
export class FileChatVariableContribution implements FrontendVariableContribution {
    @inject(FileService)
    protected readonly fileService: FileService;

    @inject(WorkspaceService)
    protected readonly wsService: WorkspaceService;

    @inject(QuickInputService)
    protected readonly quickInputService: QuickInputService;

    @inject(QuickFileSelectService)
    protected readonly quickFileSelectService: QuickFileSelectService;

    registerVariables(service: FrontendVariableService): void {
        service.registerArgumentPicker(FILE_VARIABLE, this.triggerArgumentPicker.bind(this));
        service.registerArgumentCompletionProvider(FILE_VARIABLE, this.provideArgumentCompletionItems.bind(this));
        service.registerDropHandler(this.handleDrop.bind(this));
    }

    protected async triggerArgumentPicker(): Promise<string | undefined> {
        // triggered when the user auto-completes the variable name in the chat input, e.g. #file
        // below we use the quick input service to show a file picker
        const quickPick = this.quickInputService.createQuickPick();
        quickPick.items = await this.quickFileSelectService.getPicks();

        const updateItems = async (value: string) => {
            quickPick.items = await this.quickFileSelectService.getPicks(value, CancellationToken.None);
        };

        const onChangeListener = quickPick.onDidChangeValue(updateItems);
        quickPick.show();

        return new Promise(resolve => {
            quickPick.onDispose(onChangeListener.dispose);
            quickPick.onDidAccept(async () => {
                const selectedItem = quickPick.selectedItems[0];
                if (selectedItem && FileQuickPickItem.is(selectedItem)) {
                    quickPick.dispose();
                    resolve(await this.wsService.getWorkspaceRelativePath(selectedItem.uri));
                }
            });
        });
    }

    protected async provideArgumentCompletionItems(
        model: monaco.editor.ITextModel,
        position: monaco.Position
    ): Promise<monaco.languages.CompletionItem[] | undefined> {
        // triggered when the user auto-completes after `#` or `#<variable-name>:`
        // your implementation needs to return a list of completion items
        //...
    }

    protected async handleDrop(event: DragEvent, _: AIVariableContext): Promise<AIVariableDropResult | undefined> {
        // triggered when the user drags an element into the chat input
        // your implementation needs to read the `event.dataTransfer` and return a variable to add to the request
        // and optionally a text to add to the chat input
        const data = event.dataTransfer?.getData('selected-tree-nodes');
        if (!data) {
            return undefined;
        }

        try {
            //...
            return { variables, text };
        } catch {
            return undefined;
        }
    }
}
Using the Context Variables from Agents
Your custom agent can now use the context variables in various ways. The context variables are available in the context property of the ChatRequestModel and apply your custom logic to decide in which way your agent passes the context data to the LLM.
Your agents can use the predefined variables #contextSummary or #contextDetails in their prompt, which resolve to either a list or the full context, in your system message to transfer the attached context to the LLM. Alternatively, you can use the tool functions ~{context_ListChatContext} and ~{context_ResolveChatContext} to allow the LLM obtaining the context on demand. Please note that ignoring the context completly in you agent while displaying the context user interface in the chat will likely lead to unexpected user results.
Tool Functions
Tool functions allow an agent to provide capabilities to the underlying LLM. Compared to variables, it is up to the LLM to decide whether to use an available function or not. Functions can be used to allow the LLM to retrieve additional information or to trigger actions in the tool. Actions can be literally anything you want the LLM to be able to trigger, including modifications of data. Tool Functions can be used in requests, similarly to variables as shown in the following prompt example:
Use the following functions to access the workspace:
- ~{getWorkspaceFileList}
- ~{getFileContent}.
To implement your own tool functions, provide an implementation of interface ‘ToolProvider’, in which you specify the ID, optionally parameters and a handler that represented the function to be called, e.g. like this:
@injectable()
export class FileContentFunction implements ToolProvider {
   static ID = FILE_CONTENT_FUNCTION_ID;

   getTool(): ToolRequest {
       return {
           id: FileContentFunction.ID,
           name: FileContentFunction.ID,
           description: 'Get the content of the file',
           parameters: {
               type: 'object',
               properties: {
                   file: {
                       type: 'string',
                       description: 'The path of the file to retrieve content for',
                   }
               }
           },
           handler: (arg_string: string) => {
               const file = this.parseArg(arg_string);
               return this.getFileContent(file);
           }
       };
   }
}
See here for the full example listed above. In the handler, you can call literally any available API to execute arbitrary actions or retrieve arbitrary content, including tool-specific things.
Finally, register your ‘ToolProvider’ like this:
bind(ToolProvider).to(FileContentFunction);Slash Commands
Slash commands provide a user-friendly way to invoke prompt templates in the chat interface. They allow users to type /commandname arguments instead of the more technical #prompt:fragmentid syntax. For details on how end users use slash commands, see the user documentation on slash commands.
Slash commands are registered as prompt templates with command-specific metadata using the PromptService. Theia AI automatically provides autocomplete support, argument substitution, and agent-specific filtering.
Command Metadata Interface
Slash commands use the CommandPromptFragmentMetadata interface to define their properties:
interface CommandPromptFragmentMetadata {
    isCommand: true;                    // Marks this as a slash command
    commandName: string;                // The command name (e.g., "explain" for /explain)
    commandDescription: string;         // Description shown in autocomplete
    commandArgumentHint?: string;       // Optional hint about expected arguments
    commandAgents?: string[];           // Optional array of agent IDs that can use this command
}
Programmatic Registration Example
The following example shows how to programmatically register slash commands for an agent. This is adapted from the Claude Code integration, which registers static commands on startup:
import { PromptService } from '@theia/ai-core';
import { inject, injectable } from '@theia/core/shared/inversify';

const MY_AGENT_ID = 'MyAgent';

interface StaticSlashCommand {
    name: string;
    description: string;
    template?: string; // Optional template, defaults to `/${name}`
}

@injectable()
export class MySlashCommandsContribution {
    @inject(PromptService)
    protected readonly promptService: PromptService;

    protected staticCommands: StaticSlashCommand[] = [
        { name: 'clear', description: 'Clear the current session' },
        { name: 'config', description: 'Open configuration' },
        { name: 'help', description: 'Show help information', template: 'Provide help on: $ARGUMENTS' }
    ];

    onStart(): void {
        this.registerStaticCommands();
    }

    protected registerStaticCommands(): void {
        for (const command of this.staticCommands) {
            this.promptService.addBuiltInPromptFragment({
                id: `my-agent-slash-${command.name}`,
                template: command.template || `/${command.name}`,
                isCommand: true,
                commandName: command.name,
                commandDescription: command.description,
                commandAgents: [MY_AGENT_ID]
            });
        }
    }
}
Argument Substitution
Commands support flexible argument substitution in their templates:
$ARGUMENTS: All arguments as a single string$1,$2,$3, ...: Individual positional arguments- Quoted arguments:
/hello "John Doe"treats "John Doe" as$1
Example:
this.promptService.addBuiltInPromptFragment({
    id: 'compare-command',
    template: 'Compare and contrast $1 and $2 in detail.',
    isCommand: true,
    commandName: 'compare',
    commandDescription: 'Compare two technologies',
    commandArgumentHint: 'technology1 technology2',
    commandAgents: [MY_AGENT_ID]
});
When a user types /compare React Vue, this resolves to: "Compare and contrast React and Vue in detail."
For a complete implementation including dynamic command loading from files, see the Claude Code slash commands contribution.
Custom Response Part Rendering
This section explains the process of converting an LLM (Large Language Model) response into custom UI controls within the Theia AI default chat (or any custom chat implementation). Custom UI control can be specially highlighted text, clickable buttons or literally anything that you want to display to your users.
Learn more about the generic concept:
👉 Introducing Interactive AI Flows in Theia AI
As an example, we will use the command chat agent used in this documentation before, which is capable of identifying a command in the Theia IDE based on the user's request. We will augment this agent to render commands that the agent returns as buttons. By clicking the button, users can then directly invoke a command.
Let’s look at the basic control flow of a chat request in Theia AI (see diagram below). The flow starts with a user request in the default Chat UI (1), which is sent to the underlying LLM (2) to return an answer (3). By default, the agent can forward the response to the Chat UI as-is. However, in our scenario, the agent will parse the response and augment it with a structured response content (4). Based on this, the chat UI can select a corresponding response part renderer to be shown in the UI (5).
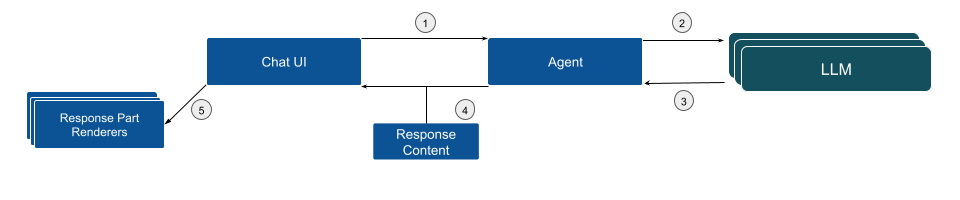
In the following, we will dive into the details on how to implement this flow.
Develop a Reliable Prompt
The first step to enable structured response parsing is developing a prompt that reliably returns the expected output. In this case, the output should include an executable Theia command related to the user's question in JSON format. The response needs to be in a parsable format, allowing the system to detect the command and provide the user with the option to execute it.
An simplified example of such a prompt might look like the following (you can review the full prompt fragment here)
You are a service that helps users find commands to execute in an IDE.
You reply with stringified JSON Objects that tell the user which command to execute and its arguments, if any.

Example:

\`\`\`json
{
   "type": "theia-command",
   "commandId": "workbench.action.selectIconTheme"
}
\`\`\`

Here are the known Theia commands:

Begin List:
{{command-ids}}
End List
As described in the previous section the variable {{command-ids}} is dynamically populated with the list of available commands.
Parse the Response and Transform into Response Content
After receiving the LLM response, the next step is to parse it in the agent implementation and transform it into a response content that can then be processed by the Chat UI. In the following code example:
- The LLM response is parsed into a command object.
- The Theia command corresponding to the parsed command ID is retrieved.
- A
CommandChatResponseContentImplobject is created to wrap the command.
You can review the parsing code, including error handling here)
Example code:
const parsedCommand = JSON.parse(jsonString) as ParsedCommand;
const theiaCommand = this.commandRegistry.getCommand(parsedCommand.commandId);
return new CommandChatResponseContentImpl(theiaCommand);
Please note that a chat response can contain a list of response parts, allowing various UI components to be mixed with actionable response components.
Parse Parts of the Response into Different Response Contents
To simplify parsing an overall response from the LLM into different parts that you want to display with specific UI components, you can add so-called response content matchers. These matchers allow you to define a regular expression that matches a specific part of the response and then transform this part into a dedicated response content. This is especially useful if you want to display different parts of the response in different ways, e.g. as a highlighted code, buttons, etc.
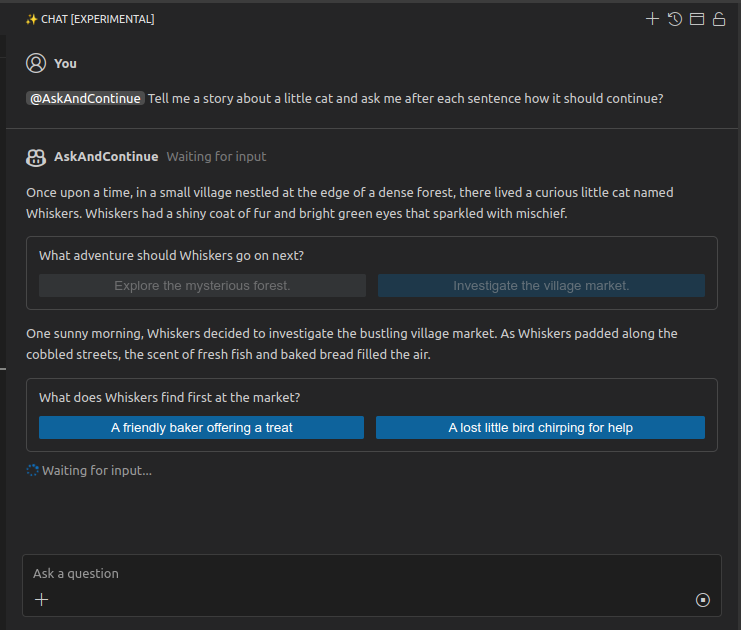
In the following example code, we define a response content matcher that matches text within <question> elements in the response and transforms them into specific QuestionResponseContentImpl objects. You can review the full code in the AskAndContinueAgent API example.
In your chat agent, you can register a response content matcher like this:
@postConstruct()
addContentMatchers(): void {
    this.contentMatchers.push({
        start: /^<question>.*$/m,
        end: /^<\/question>$/m,
        contentFactory: (content: string, request: ChatRequestModelImpl) => {
            const question = content.replace(/^<question>\n|<\/question>$/g, '');
            const parsedQuestion = JSON.parse(question);
            return new QuestionResponseContentImpl(parsedQuestion.question, parsedQuestion.options, request, selectedOption => {
                this.handleAnswer(selectedOption, request);
            });
        }
    });
}
This matcher will be invoked by the common response parser if it finds occurrences of the start and end regular expressions in the response. The contentFactory function is then invoked to transform the matched content into a specific response content object.
Create and Register a Response Part Renderer
The final step is to display a button in the Chat UI to allow users to execute the command. This is done by creating a new Response Part Renderer. The renderer is registered to handle CommandChatResponseContent, ensuring that the Chat UI calls it whenever a corresponding content type is part of the response.
The following example code shows the corresponding response renderer, you can review the full code here.
canHandleMethod: Determines whether the renderer can handle the response part. If the response is of typeCommandChatResponseContent, it returns a positive value, indicating it can process the content.renderMethod: Displays a button if the command is enabled. If the command is not executable globally, a message is shown.onCommandMethod: Executes the command when the button is clicked.
canHandle(response: ChatResponseContent): number {
    if (isCommandChatResponseContent(response)) {
        return 10;
    }
    return -1;
}

render(response: CommandChatResponseContent): ReactNode {
    const isCommandEnabled = this.commandRegistry.isEnabled(response.command.id);
    return (
        isCommandEnabled ? (
            <button className='theia-button main' onClick={this.onCommand.bind(this)}>{response.command.label}</button>
        ) : (
            <div>The command has the id "{response.command.id}" but it is not executable globally from the Chat window.</div>
        )
    );
}

private onCommand(arg: AIChatCommandArguments): void {
    this.commandService.executeCommand(arg.command.id);
}
Finally, the custom response renderer needs to be registered:
bind(ChatResponsePartRenderer).to(CommandPartRenderer).inSingletonScope();By following the steps outlined, you can transform an LLM response into custom and optionally actionable UI controls within Theia AI. See the Theia IDE documentation on how the example looks integrated in a tool. This approach enables users to interact with the AI-powered Chat UI more efficiently, e.g. allowing executing commands directly from the suggestions provided.
Managing the State of a Chat Response
Theia AI provides a mechanism for chat agents to manage the state of a chat response. A chat response has the following states:
isComplete: booleanisWaitingForInput: booleanisError: boolean
If all are false, the chat interface will show Generating... until either an error occurs or the response is complete. While the response is in progress, users can only cancel the request. Once isComplete is set to true, the response is final and users can submit new requests. In your chat agent you can control the state via request.response.cancel(), request.response.complete(), and request.response.error().
Progress Messages
In addition you can also show progress messages in the response to the user:
const progressMessage = request.response.addProgressMessage({ content: 'Analyzing your request...', show: 'whileIncomplete' });
// do your work
// if you are done, you can update the message
request.response.updateProgressMessage({ ...progressMessage, show: 'whileIncomplete', status: 'completed' });
With the show property, you can control whether your message is shown untilFirstContent, whileIncomplete, or forever.
Waiting for Input
Especially in more agentic interactions, you might need input from the user, without completing the response. Typical use cases are confirmation dialogs, asking the user to select among defined options, etc. before continuing the request. In this case, you can render a content part with which you ask the user for input (e.g. with the QuestionResponseContentImpl) and set the response into a waiting-for-input state without completing it, to signalize the response is not complete yet, but you are waiting for user input.
In your chat agent implementation, you can use the onResponseComplete() hook, which will be invoked when the LLM response is completed. In this hook, you can check if you need to wait for input and set the response to isWaitingForInput:
protected override async onResponseComplete(request: ChatRequestModelImpl): Promise<void> {
    const unansweredQs = unansweredQuestions(request);
    if (unansweredQs.length < 1) {
        return super.onResponseComplete(request); // completes the response
    }
    request.response.addProgressMessage({ content: 'Waiting for input...', show: 'whileIncomplete' });
    request.response.waitForInput();
}
In combination with the custom response part rendering (see above), this enables arbitrarily complex interactions with the user, including multi-step interactions, confirmation dialogs, and more. A simple example is available in the AskAndContinueChatAgent, which implements an interactive chat agent that asks the user for input and continues the conversation based on the user's response.
Custom LLM Provider
Theia AI currently provides out-of-the-box support for any OpenAI-compatible LLM services (including the OpenAI models hosted by OpenAI or self-hosted compatible LLMs), Hugging Face, Ollama LLMs and Llamafile.
Note: Theia AI enables connections to various models. However, be aware that some models may require specific customizations and optimizations to perform well in all scenarios. If you encounter issues implementing those customizations, please provide feedback.
Learn more about which LLM providers are supported out of the box in at the example of the Theia IDE, which allows end users to configure the used LLM per agent. Of course, as a tool provider you can choose whether you provide this configurability to end users.
As a tool provider, you can easily add support for additional LLM APIs too. Please consider contributing your additional LLM providers to the open source project, so that the community can benefit from increased compatibility and share the maintenance cost.
To support a specific LLM API, you basically need to provide an implementation of the interface ‘LanguageModel’, which provides an abstraction between agents and the underlying LLM. This language model implementation then needs to be registered at the ‘LanguageModelRegistry’, to make it retrievable for agents as follows:
this.languageModelRegistry.addLanguageModels([new OllamaModel()]);If you want to allow the user to configure the LLM provider, e.g. change the URL or the available models, consider integrating your LLM provider with Theias preference system.
For further details, we recommend reviewing the available LLM provider in Theia AI:
Please note that Theia AI currently does not provide a fixed contribution point for Language Models, yet. This is due to the fact that we are working on supporting more models and also capabilities of new LLMs are emerging at the moment, such as function calling and structured output. We plan to consolidate the LLM Provider interfaces within the next months while adding more LLM Providers to the core framework. We are happy for feedback and contributions in this area.
Change Sets
Change sets in Theia AI provide a mechanism for AI agents (and therefore the underlying LLMs) to propose changes to users. These proposed changes can then be reviewed, accepted, refined, or declined by the user. Theia AI offers framework support for generic change sets, a default UI integrated in the generic, reusable chat interface and Theia AI includes a default implementation for file-based changes. This default implementation is utilized in the Theia IDE, particularly with the Theia Coder agent. However, adopters can provide alternative implementations to handle different types of changes, such as modifications to databases, structured models, or other domain-specific data.
Learn more about the concept:
👉 Theia AI Change Sets: Managing Complex AI Change Suggestions
👉 Introducing Theia Coder - the open AI coding agent with full control
Example usage of Change Sets
The following example demonstrates how agents can propose file modifications using a change set. Please have a look at the full example for using change sets in agents.
override async invoke(request: ChatRequestModelImpl): Promise<void> {
        // ...
        const fileToAdd = root.resource.resolve('hello/new-file.txt');
        const fileToChange = // some file to change
        const fileToDelete = // Some file to delete

        const chatSessionId = request.session.id;
        const changeSet = new ChangeSetImpl('My Test Change Set');
        changeSet.addElement(
            this.fileChangeFactory({
                uri: fileToAdd,
                type: 'add',
                state: 'pending',
                targetState: 'Hello World!',
                changeSet,
                chatSessionId
            })
        );

        if (fileToChange && fileToChange.resource) {
            changeSet.addElement(
                this.fileChangeFactory({
                    uri: fileToChange.resource,
                    type: 'modify',
                    state: 'pending',
                    targetState: await this.computeTargetState(fileToChange.resource),
                    changeSet,
                    chatSessionId
                })
            );
        }
        if (fileToDelete && fileToDelete.resource) {
            changeSet.addElement(
                this.fileChangeFactory({
                    uri: fileToDelete.resource,
                    type: 'delete',
                    state: 'pending',
                    changeSet,
                    chatSessionId
                })
            );
        }
        request.session.setChangeSet(changeSet);
        request.response.complete();
}
This example demonstrates how:
- A change set is created
- An example file element of all available types (add, modify, or delete) is added.
- A proposed change is added to the change set for user review.
Another example to look at is the Theia Coder agent which proposes file modifications using a change set. In this use case, the change set creation is embedded in a tool function that Coder provides to the LLM (see also the full code). So in this workflow, the LLM can directly create and augment change sets.
Custom Change Set Elements
Adopters can implement their own version of 'ChangeSetElement' to manage domain-specific changes while leveraging the existing review and approval workflow. This will still allow to use the generic change set and the default Chat UI provided by Theia AI. To provide custom type of 'ChangeSetElement', implement the respective interface and add your custom elements to the default change set.
Custom change set element implementations are identified by a uri, have full control over their presentation (label, icon, additional information), and can specify whether and how actions, such as open, open change, accept and discard are implemented. See ChangeSetElement interface for more details.
Chat Suggestions
Theia AI provides a mechanism for displaying contextual suggestions to users in the chat interface. These suggestions can help guide users on what to do next, offer shortcuts to common actions, or provide contextual help based on the current state of the conversation.
The following video demonstrates how suggestions look like in the UI.
You can add suggestions to a chat session by accessing the chat model API, e.g. from within an agent implementation. The suggestions can be text augmented with different types of actions:
- Command-based suggestions: Trigger Theia commands when clicked
- Callback-based suggestions: Execute custom code (a callback) when clicked
Here's an example of how to add suggestions to a chat model with custom callback code when a link in the suggestion is clicked:
model.setSuggestions([
    {
        kind: 'callback',
        callback: () => this.chatService.sendRequest(session.id, { text: '@Coder please look at src/docs/theia_ai.md and fix any problems.' }),
        content: '[Fix problems](_callback) in the current file.'
    },
]);
In this example, when the user clicks on the "Fix problems" suggestion, it will automatically send a request to the Coder agent to analyze and fix issues in the specified file.
For command-based suggestions, you can use MarkdownStringImpl and specify command identifier in links:
model.setSuggestions([
    new MarkdownStringImpl(`Keep chats short and focused. [Start a new chat](command:${AI_CHAT_NEW_CHAT_WINDOW_COMMAND.id}) for a new task`
        + ` or [start a new chat with a summary of this one](command:${ChatCommands.AI_CHAT_NEW_WITH_TASK_CONTEXT.id}).`)
]);
For comprehensive example, also see the Coder agent in the AI-powered Theia IDE (see coder-agent.ts) providing different suggestions based on the context of the conversation.
Learn more
👉 Introducing Theia AI: The Open Framework for Building AI-native Custom Tools and IDEs
👉 Introducing the AI-powered Theia IDE: AI-driven coding with full Control
